목차
1. 뷰view 기본 개념
뷰
- 화면을 구성하는 모든 요소
뷰그룹
- 뷰들을 여러 개 포함하고 있는 것
- 뷰 그룹도 뷰를 상속함
위젯
- 뷰 중 일반적인 컨트롤(화면 상에서 눈에 보이는 것)
레이아웃
- 뷰 그룹 중 뷰들을 배치하는 것
안드로이드는 뷰와 위젯, 뷰그룹과 레이아웃의 개념을 혼용하고 있습니다. 즉, 어떤 것이 뷰이고 어떤 것이 위젯인가에 대해 명확하게 구분하기 보다는 화면을 구성하는 일반적인 요소를 뷰라고 정의한 것을 뷰라고 정의한 후 그 중에서 사용자의 눈에 보이는 컨트롤의 역할을 하는 구성 요소를 위젯이라고 정의하고 있습니다. 마찬가지로 뷰를 담고 있는 그릇을 뷰그룹이라고 정의한 후 그 안의 뷰들을 배치하는 역할을 하는 것을 레이아웃이라고 정의하고 있습니다.
2. XML 레이아웃의 구성
뷰 태그와 속성으로 구성됩니다.
<?xml version="1.0" encoding="utf-8"?>
<androidx.constraintlayout.widget.ConstraintLayout xmlns:android="http://schemas.android.com/apk/res/android"
    xmlns:app="http://schemas.android.com/apk/res-auto"
    xmlns:tools="http://schemas.android.com/tools"
    android:layout_width="match_parent"
    android:layout_height="match_parent"
    tools:context=".MainActivity"> <!-- 최상위 레이아웃 시작 -->
    <!-- "android:" 형식은 안드로이드 API에 기본으로 들어가는 속성을 쓸 때 사용 -->

    <Button
        android:id="@+id/button3"
        android:layout_width="wrap_content"
        android:layout_height="wrap_content"
        android:layout_marginTop="100dp"
        android:text="시작"
        app:layout_constraintStart_toStartOf="@+id/guideline"
        app:layout_constraintTop_toTopOf="parent" />

</androidx.constraintlayout.widget.ConstraintLayout> <!-- 최상위 레이아웃 끝 -->
태그 이름 중 androidx.constraintlayout.widget.ConstraintLayout 과 같이 패키지 이름이 포함된 경우는 android에서 제공하는 API 안에 포함되지 않은 외부 라이브러리를 쓰는 경우입니다.
가로 크기와 세로 크기 속성
layout_width, layout_height는 모든 뷰의 필수 속성으로 뷰의 폭과 높이를 설정합니다. 이 속성들은 세 가지 값을 가질 수 있습니다.
| 속성 값 종류 | 설명 |
|---|---|
| match_parent | 뷰 그룹에 남아 있는 여유 공간을 채움 |
| wrap_content | 뷰에 들어 있는 내용물의 크기에 따라 뷰의 크기가 결정됨 |
| 크기 값 지정 | 크기를 고정된 값으로 직접 지정함 |
예전에는 fil_parent 속성도 존재했습니다.
뷰의 크기 지정에 사용되는 단위
| 단위 | 단위 표현 | 설명 |
|---|---|---|
| px | 픽셀 | 화면 픽셀 |
| dp 또는 dip | 밀도 독립적 픽셀 | 160dpi 화면을 기준으로 한 셀(1인치 당 320개의 점이 있는 디스플레이 화면에서 1dp는 2px과 같음) |
| sp 또는 sip | 축적 독립적 픽셀 | 가변 글꼴을 기준으로 한 픽셀로 dp와 유사하지만 글꼴의 설정에 따라 달라짐 |
| in | 인치 | 1인치로 된 물리적 길이 |
| mm | 밀리미터 | 1밀리미터로 된 물리적 길이 |
| em | 텍스트 크기 | 글꼴과 상관없이 동일한 텍스트 크기 표시 |
뷰의 영역
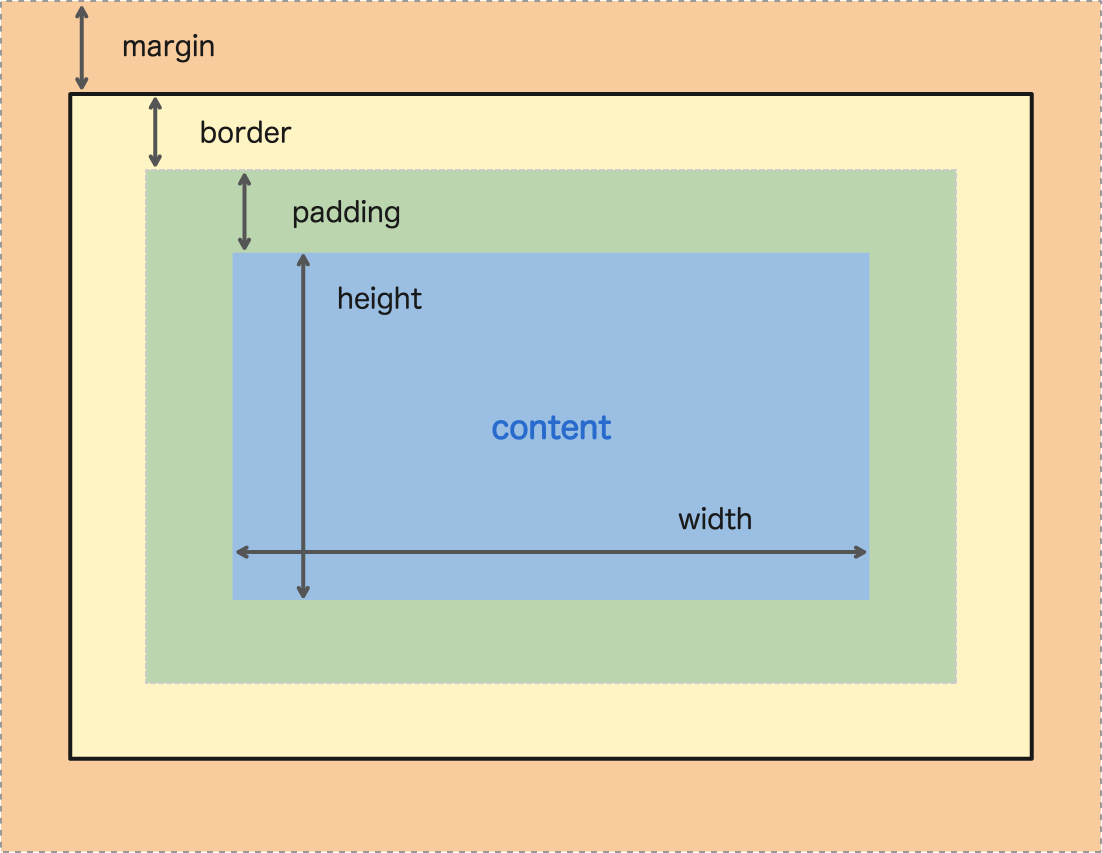
CSS의 영역와 동일한 개념입니다. 안에 content와 테두리(border) 사이의 거리를 padding, border와 다른 뷰와의 거리를 margin이라고 합니다. margin으로 감싸는 영역을 뷰의 영역이라고 할 수 있습니다.
뷰의 배경색
색상을 설정할 수 있습니다. ARGB 기준으로 16진수 두 자리씩 할당하여 # 뒤에 코드를 붙입니다. #FF00FF00에서 투명도가 FF이므로 불투명, R은 00, G는 FF, B는 00이므로 이 색상은 불투명 녹색을 의미합니다.
3. 대표적인 레이아웃
| 레이아웃 이름 | 설명 |
|---|---|
| 제약 레이아웃 (ConstraintLayout) | 제약 조건(Constraint) 기반 모델 default layout |
| 리니어 레이아웃 (LinearLayout) | 박스(Box) 모델 한 쪽 방향대로 차례대로 뷰를 추가하여 화면을 구성하는 방법 |
| 상대 레이아웃 (RelativeLayout) | 규칙(Rule) 기반 모델 부모 컨테이너나 다른 뷰와의 상대적 위치로 화면을 구성하는 방법 |
| 프레임 레이아웃 (FrameLayout) | 싱글(Single) 모델 가장 상위에 있는 하나의 뷰(또는 뷰그룹)만을 보여주는 방법 |
| 테이블 레이아웃 (TableLayout) | 격자(Grid) 모델 격자 모양의 배열을 사용하여 화면을 구성하는 방법 많이 사용하지 않음 |
4. 제약 레이아웃
제약 레이아웃의 가장 큰 특징은 뷰의 크기와 위치를 결정할 때 제약 조건(Constraint)를 사용하는 것입니다.
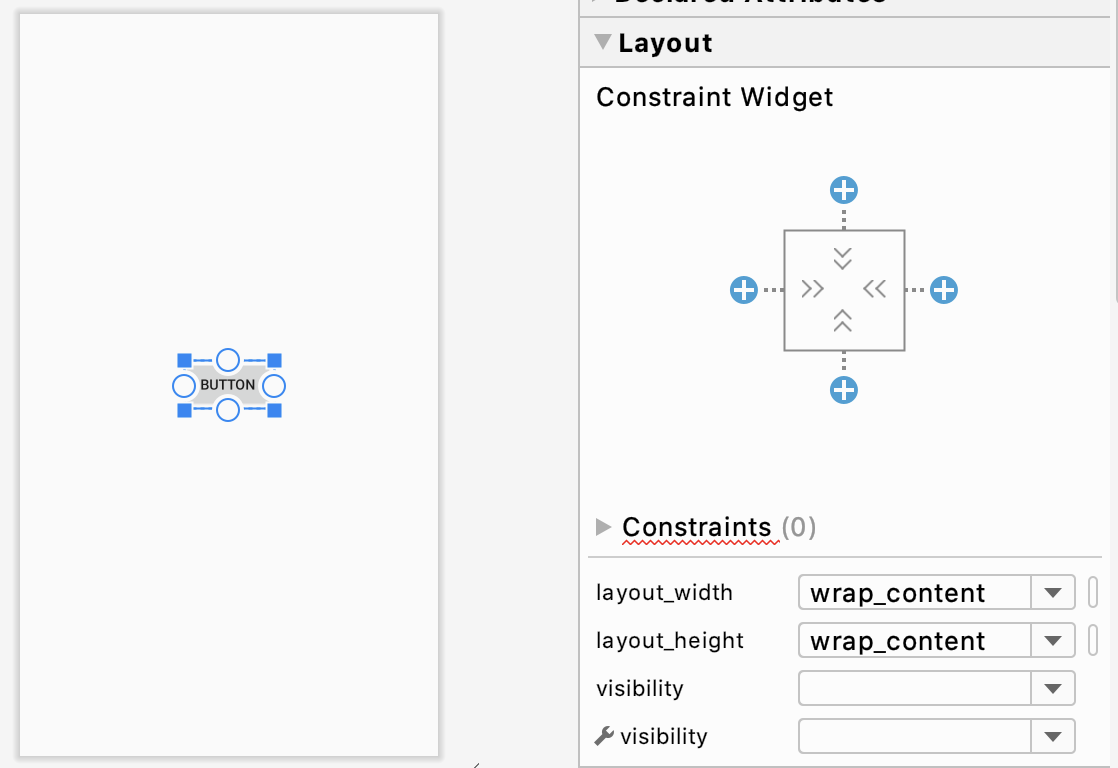
버튼 모서리의 사각형 모양을 핸들, 버튼 테두리 가운데 있는 점을 연결점(anchor point) 라고 합니다. 연결점을 다른 뷰와의 연결해서 만들어지는 연결선이 제약조건(constraint)가 됩니다. 예를 들어 봅시다.
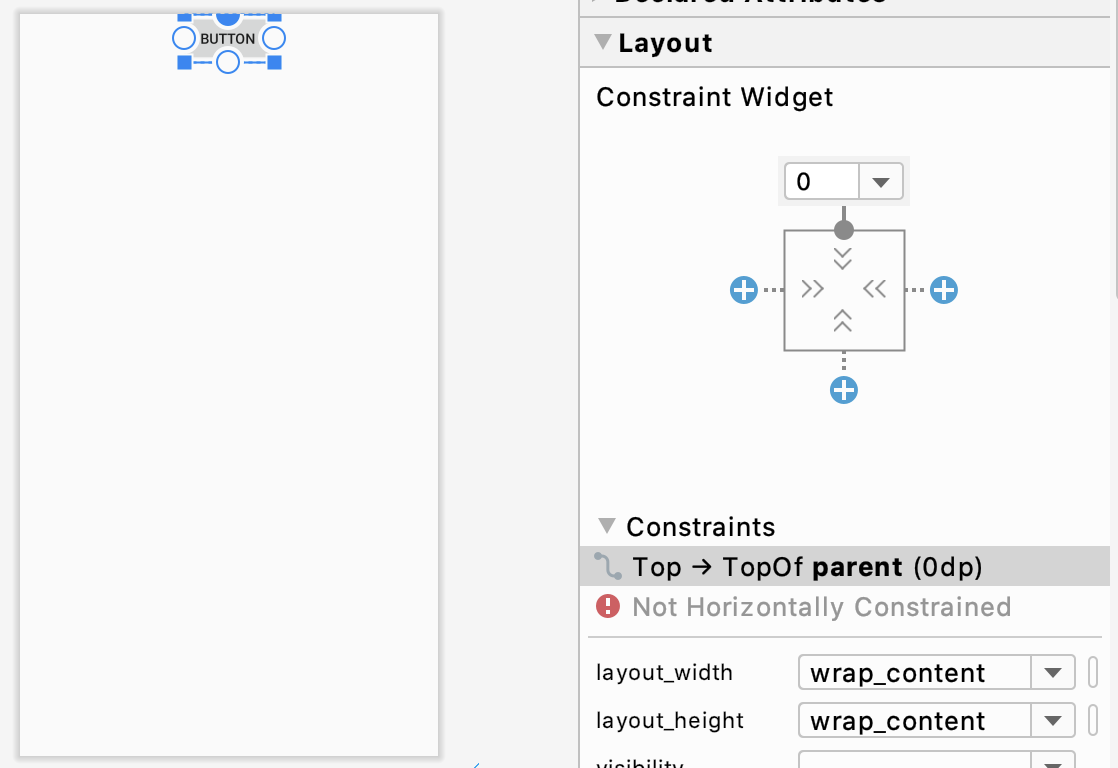
이 전 화면에서 보이던 연결점을 끌어 부모 레이아웃의 벽면에 붙이면 제약 조건이 만들어집니다. 오른쪽 property 창에서 관련 정보를 확인할 수 있습니다. 버튼을 드래그 하거나 property 창에서 Margin 값을 변경하여 위치를 바꿀 수 있습니다. property 창에서 점을 누르면 연결선이 사라집니다.
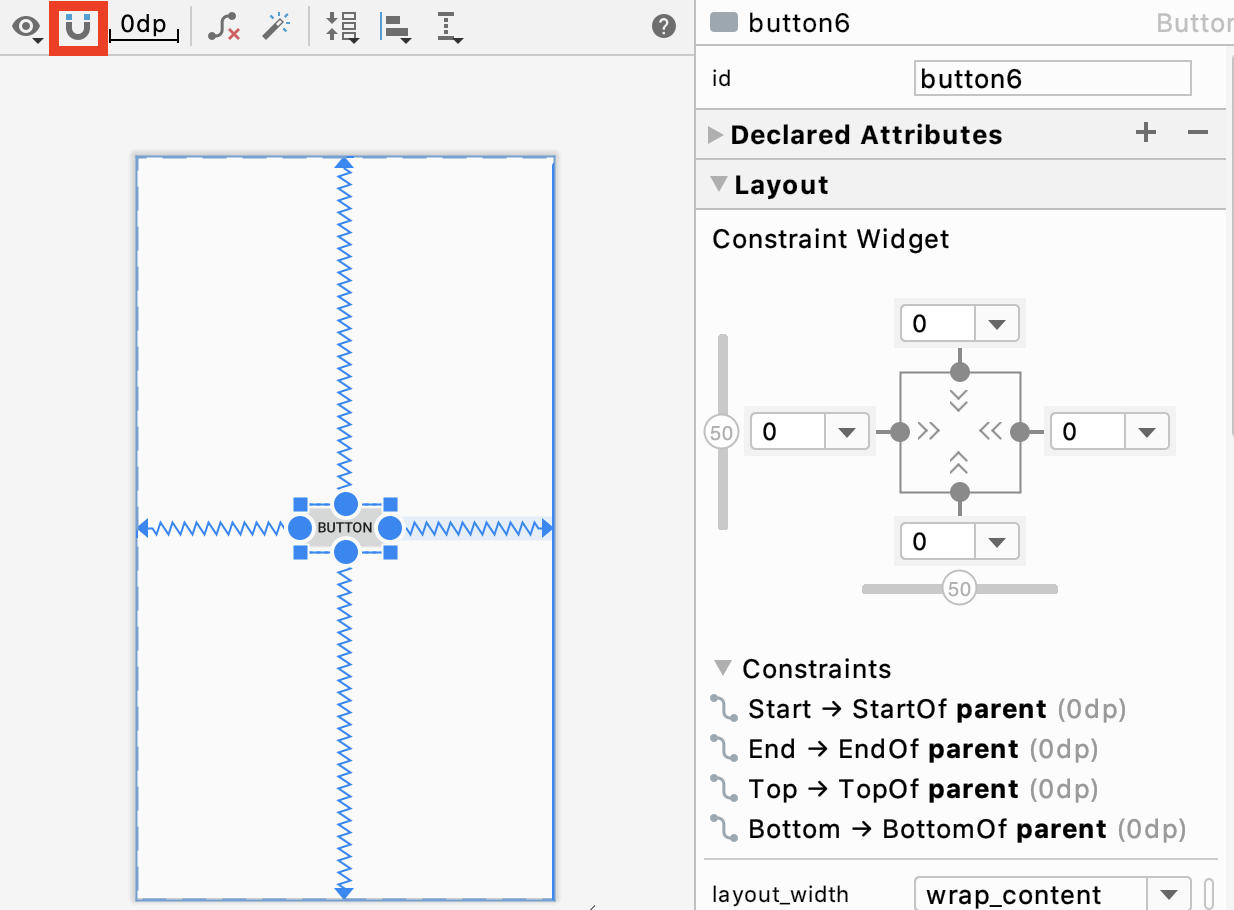
자석은 연결선을 자동으로 만들어주는 역할을 합니다. 처음 버튼을 만들 시에 위의 자석을 클릭한 상태에서 정가운데 로 끌어 만든다면, 자동으로 상하좌우 연결선을 만듭니다.
property 창에서 상하, 좌우로 된 스크롤을 이동시키면 버튼의 위치가 이동시킨 만큼 한 쪽으로 편중됩니다. 이 스크롤을 바이어스라고 합니다.
가이드라인
가이드라인(guidelien) 은 여러 개의 뷰를 일정한 기준 선에 정렬할 때 사용합니다. orientation은 필수 속성입니다. layout_constraintGuide_begin 속성은 세로 방향일 때 왼쪽부터, 가로 방향인 경우 위쪽부터의 거리를 지정하는 속성입니다. layout_constraintGuide_end는 반대로 생각하시면 됩니다. layout_constraintGuide_percent는 layout_constraintGuide_begin과 동일하되 % 단위로 거리를 지정합니다. 아래는 예시입니다.
<androidx.constraintlayout.widget.Guideline
    android:id="@+id/guideline"
    android:layout_width="wrap_content"
    android:layout_height="wrap_content"
    android:orientation="vertical"
    app:layout_constraintGuide_begin="78dp" />
가이드라인은 제약 레이아웃의 기능 중에서 나중에 추가된 것이므로 베타 버전의 라이브러리에서는 가이드라인이 정상적으로 동작하지 않는 경우가 있습니다. 이럴 경우에는 가이드라인이 정상적으로 동작하는 버전의 라이브러리로 업그레이드하기 바랍니다.
5. 리니어 레이아웃
<?xml version="1.0" encoding="utf-8"?>
<LinearLayout xmlns:android="http://schemas.android.com/apk/res/android"
    android:layout_width="match_parent"
    android:layout_height="match_parent"
    android:orientation="vertical">
</LinearLayout>
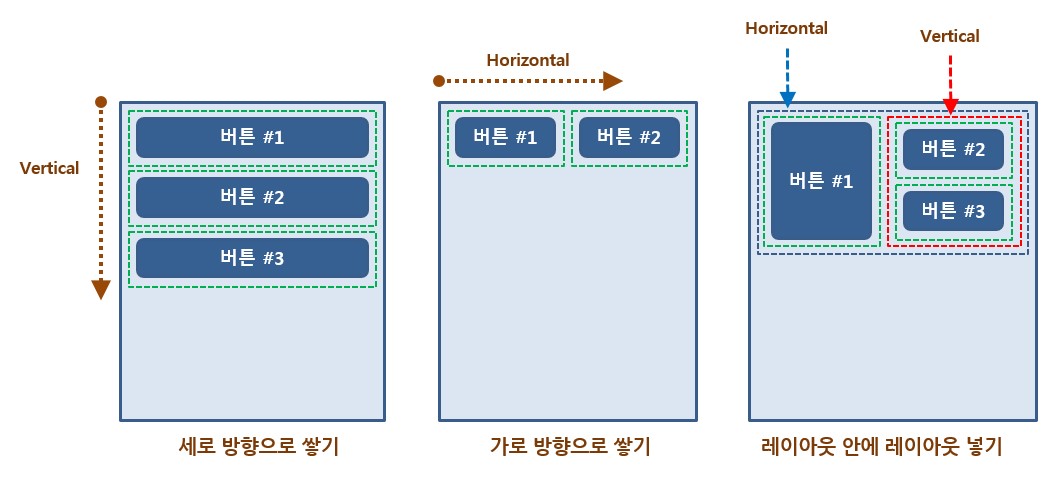
기본 레이아웃 코드입니다. layout_width, layout_height 속성 외에 orientation이 필수 속성입니다. 이 속성은 vertical, horizontal 값을 선택할 수 있습니다.
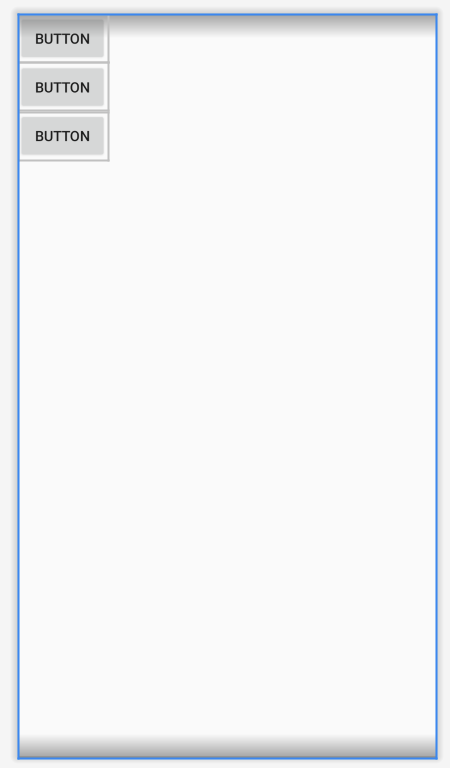
orientation에 vertical 값을 주었을 때, 버튼 중 하나의 layout_width 속성을 match_parent 값을 준다면 그 버튼이 parent의 width를 차지하므로 다른 두 개의 버튼은 영역을 차지할 수 없습니다. 이런 점을 주의해서 사용해야 합니다. 또한 전과 같은 상황에서 버튼들에 wrap_content 값을 주었을 때(= 왼쪽 그림), 버튼들은 세로로 정렬하기 때문에 버튼의 오른쪽 빈 공간이 남아도 다음 버튼은 아래로 추가됩니다.
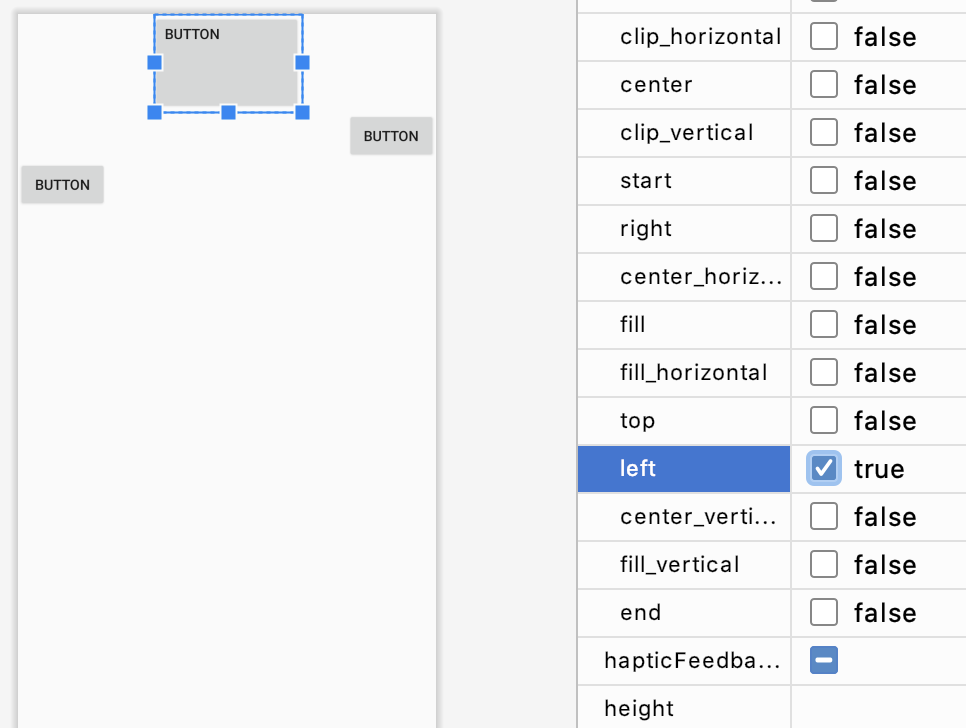
layout_gravity
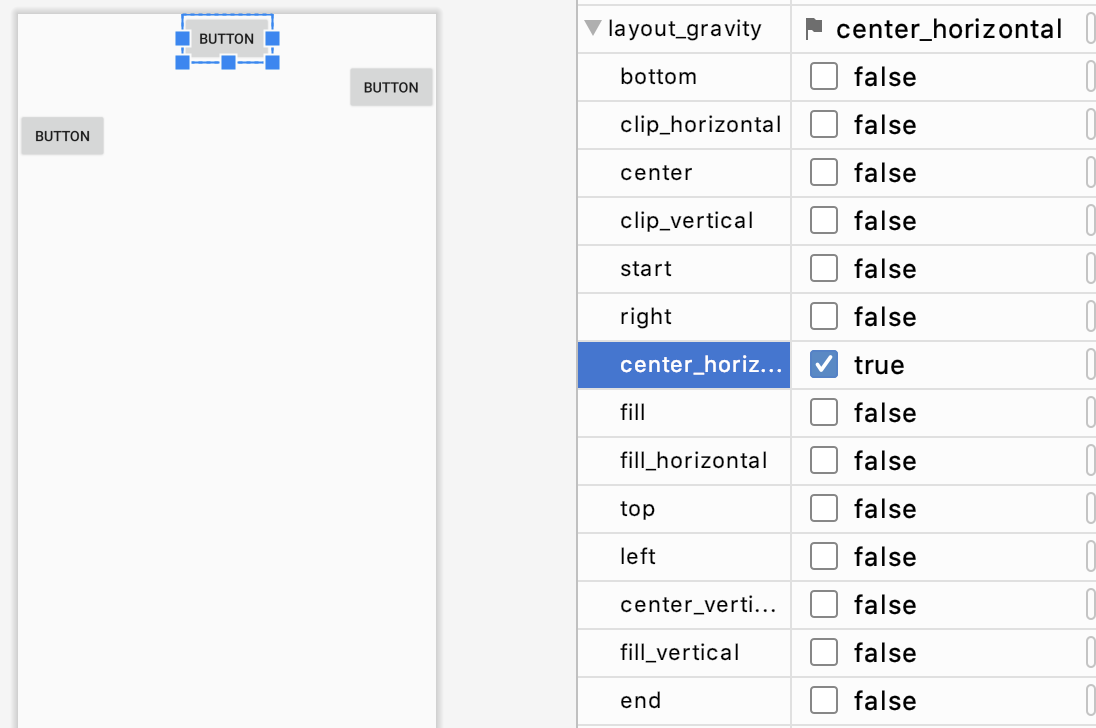
layout_gravity 속성을 이용하여 뷰를 정렬할 수 있습니다. 다만, 여유공간이 있을 때만 정렬이 가능합니다.
gravity
gravity 속성을 이용하여 뷰의 내용을 정렬할 수 있습니다.
weight
<?xml version="1.0" encoding="utf-8"?>
<LinearLayout xmlns:android="http://schemas.android.com/apk/res/android"
    android:layout_width="match_parent"
    android:layout_height="match_parent"
    android:orientation="horizontal">

    <Button
        android:id="@+id/button"
        android:layout_width="wrap_content"
        android:layout_height="wrap_content"
        android:layout_weight="1"
        android:text="Button" />
</LinearLayout>

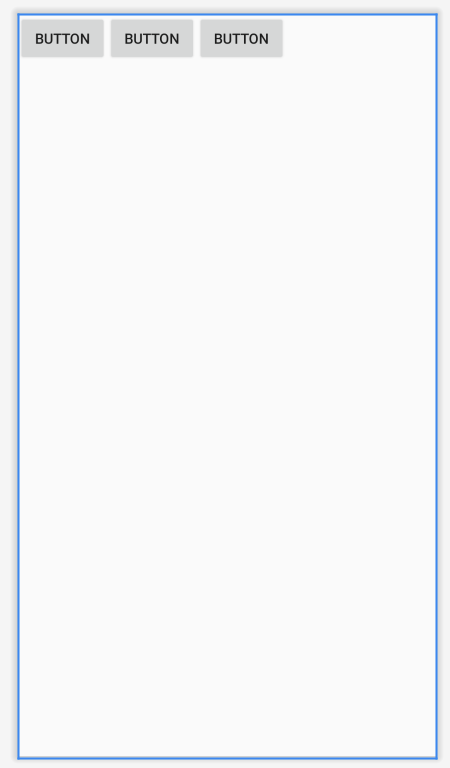
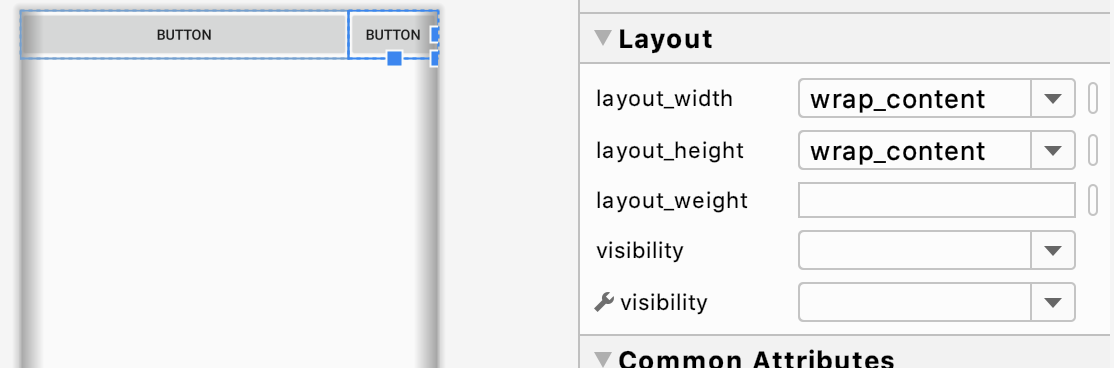
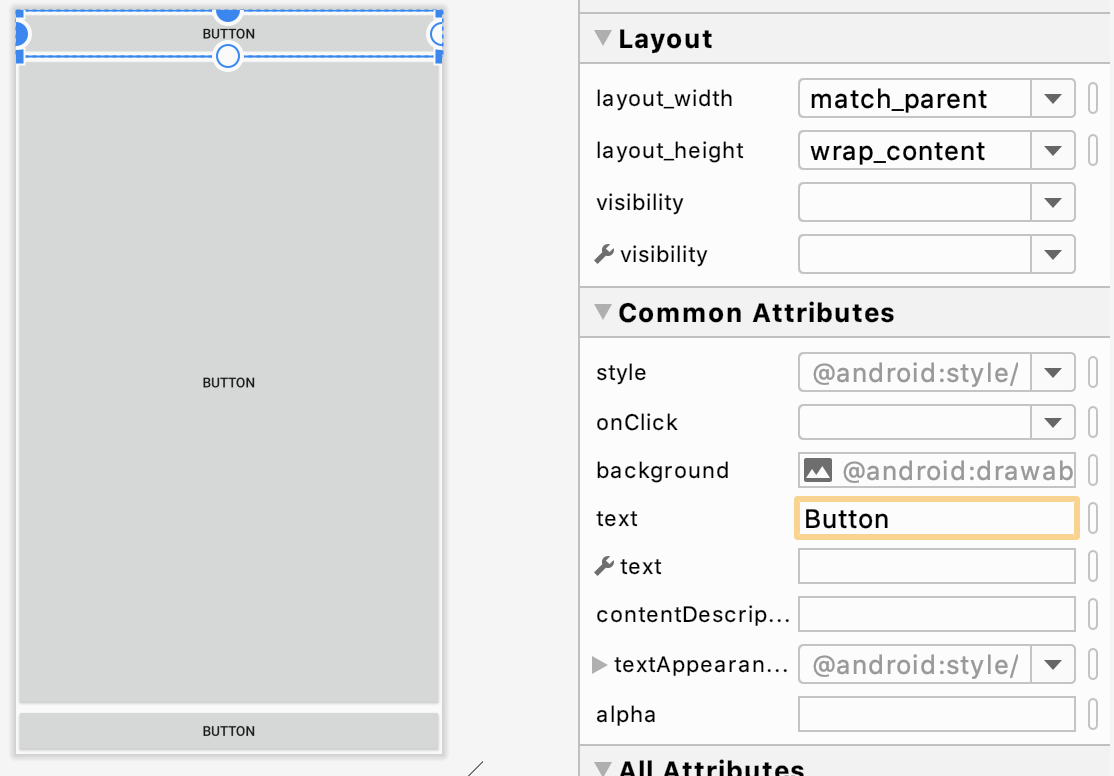
버튼의 layout_width, layout_height 속성이 wrap_content인데 match_parent인 것처럼 되어 있습니다. 왜일까요? 이는 layout_weight 속성 때문입니다.
부모 컨테이너에 추가한 뷰들이 차지하는 공간 이외의 여유 공간은 layout_weight 속성으로 분할할 수 있습니다. layout_weight 속성으로 숫자 값을 지정하면 그 숫자는 분할 비율이 되며 그 값의 비율만큼 여유 공간을 분할한 후 해당 뷰에게 할당합니다.
<?xml version="1.0" encoding="utf-8"?>
<LinearLayout xmlns:android="http://schemas.android.com/apk/res/android"
    android:layout_width="match_parent"
    android:layout_height="match_parent"
    android:orientation="horizontal">

    <Button
        android:id="@+id/button"
        android:layout_width="wrap_content"
        android:layout_height="wrap_content"
        android:layout_weight="1"
        android:text="Button" />

    <Button
        android:id="@+id/button2"
        android:layout_width="wrap_content"
        android:layout_height="wrap_content"
        android:text="Button" />
</LinearLayout>
주의해서 봐야할 부분은 코드의 버튼 layout_weight 속성입니다. layout_weight 속성을 설정하면 button1은 button2가 차지하고 남은 부분을 할당받습니다. 두 개 이상의 버튼에 layout_weight 속성을 할당하면 어떨까요?
<?xml version="1.0" encoding="utf-8"?>
<LinearLayout xmlns:android="http://schemas.android.com/apk/res/android"
    android:layout_width="match_parent"
    android:layout_height="match_parent"
    android:orientation="horizontal">

    <Button
        android:id="@+id/button"
        android:layout_width="wrap_content"
        android:layout_height="wrap_content"
        android:layout_weight="1"
        android:text="Button" />

    <Button
        android:id="@+id/button4"
        android:layout_width="wrap_content"
        android:layout_height="wrap_content"
        android:layout_weight="1"
        android:text="Button" />
</LinearLayout>

똑같이 weight를 1로 주면 동일한 비율로 할당받습니다. 만약 하나가 1, 다른 하나가 2의 weight를 할당 받으면 1/3, 2/3의 크기를 가지게 됩니다.
주의해야 할 점은 layout_weight가 할당하는 크기는 원래의 뷰 크기에 추가된다는 점입니다. layout_width, layout_height으로 지정한 값에 추가합니다.
match_parent로 크기를 지정했다면 예상치 못한 결과가 발생할 수 있습니다.
6. 상대 레이아웃
제약 레이아웃과 비슷하지만 기능이 적습니다. Xcode와 레이아웃 방식과 유사하게 만들다 보니까 기존에 존재했던 상대 레이아웃 대신 새롭게 제약 레이아웃이 만들어졌다고 합니다.
상대 레이아웃은 부모 레이아웃 또는 다른 뷰와의 관계를 통해 뷰의 위치를 결정합니다. 아래 예시를 통해 살펴봅시다.
<?xml version="1.0" encoding="utf-8"?>
<RelativeLayout xmlns:android="http://schemas.android.com/apk/res/android"
    android:layout_width="match_parent"
    android:layout_height="match_parent">

    <Button
        android:id="@+id/button"
        android:layout_width="match_parent"
        android:layout_height="wrap_content"
        android:layout_alignParentStart="true"
        android:layout_alignParentLeft="true"
        android:layout_alignParentTop="true"
        android:text="Button" />

    <Button
        android:id="@+id/button2"
        android:layout_width="match_parent"
        android:layout_height="match_parent"
        android:layout_below="@+id/button"
        android:layout_above="@+id/button3"
        android:layout_alignParentStart="true"
        android:layout_alignParentLeft="true"
        android:text="Button" />

    <Button
        android:id="@+id/button3"
        android:layout_width="match_parent"
        android:layout_height="wrap_content"
        android:layout_alignParentStart="true"
        android:layout_alignParentLeft="true"
        android:layout_alignParentBottom="true"
        android:text="Button" />
</RelativeLayout>
상대 레이아웃에서 부모 컨테이너와의 상대적 위치를 이용해 뷰를 배치할 수 있는 속성들은 layout_alignParentTop, layout_alignParentBottom, layout_alignParentLeft 등이 있습니다.
상대 레이아웃에서 다른 뷰들과의 상대적 위치를 이용해 뷰를 배치할 수 있는 속성은 다음과 같습니다. layout_above, layout_below, layout_toLeftOf 등이 있습니다.
layout_below는 해당 뷰(@+id/button2)를 선택한 뷰(@+id/button) 아래에 놓는 속성이고, layout_above는 해당 뷰(@+id/button2)를 선택한 뷰(@+id/button3) 위에 놓는 속성입니다. 이 예시는 LinearLayout보다 RelativeLayout으로 만드는 게 유리합니다. 다양하게 연습해봅시다.
layout_leftOf는 layout_left는 해당 요소의 왼쪽 끝선을 이곳에 지정한 ID를 가지는 요소의 왼쪽 끝선과 일치시킵니다.
7. 프레임 레이아웃
한 번에 하나의 뷰만 보여주며, 다른 뷰들은 그 아래에 중첩되어 쌓이는 방식입니다. 중첩되는 효과와 함게 뷰의 visibility 속성을 이용해 다양한 화면 구성이 가능합니다. 아래 예시를 만들어 봅시다. 버튼을 클릭하면 이미지가 변경됩니다.
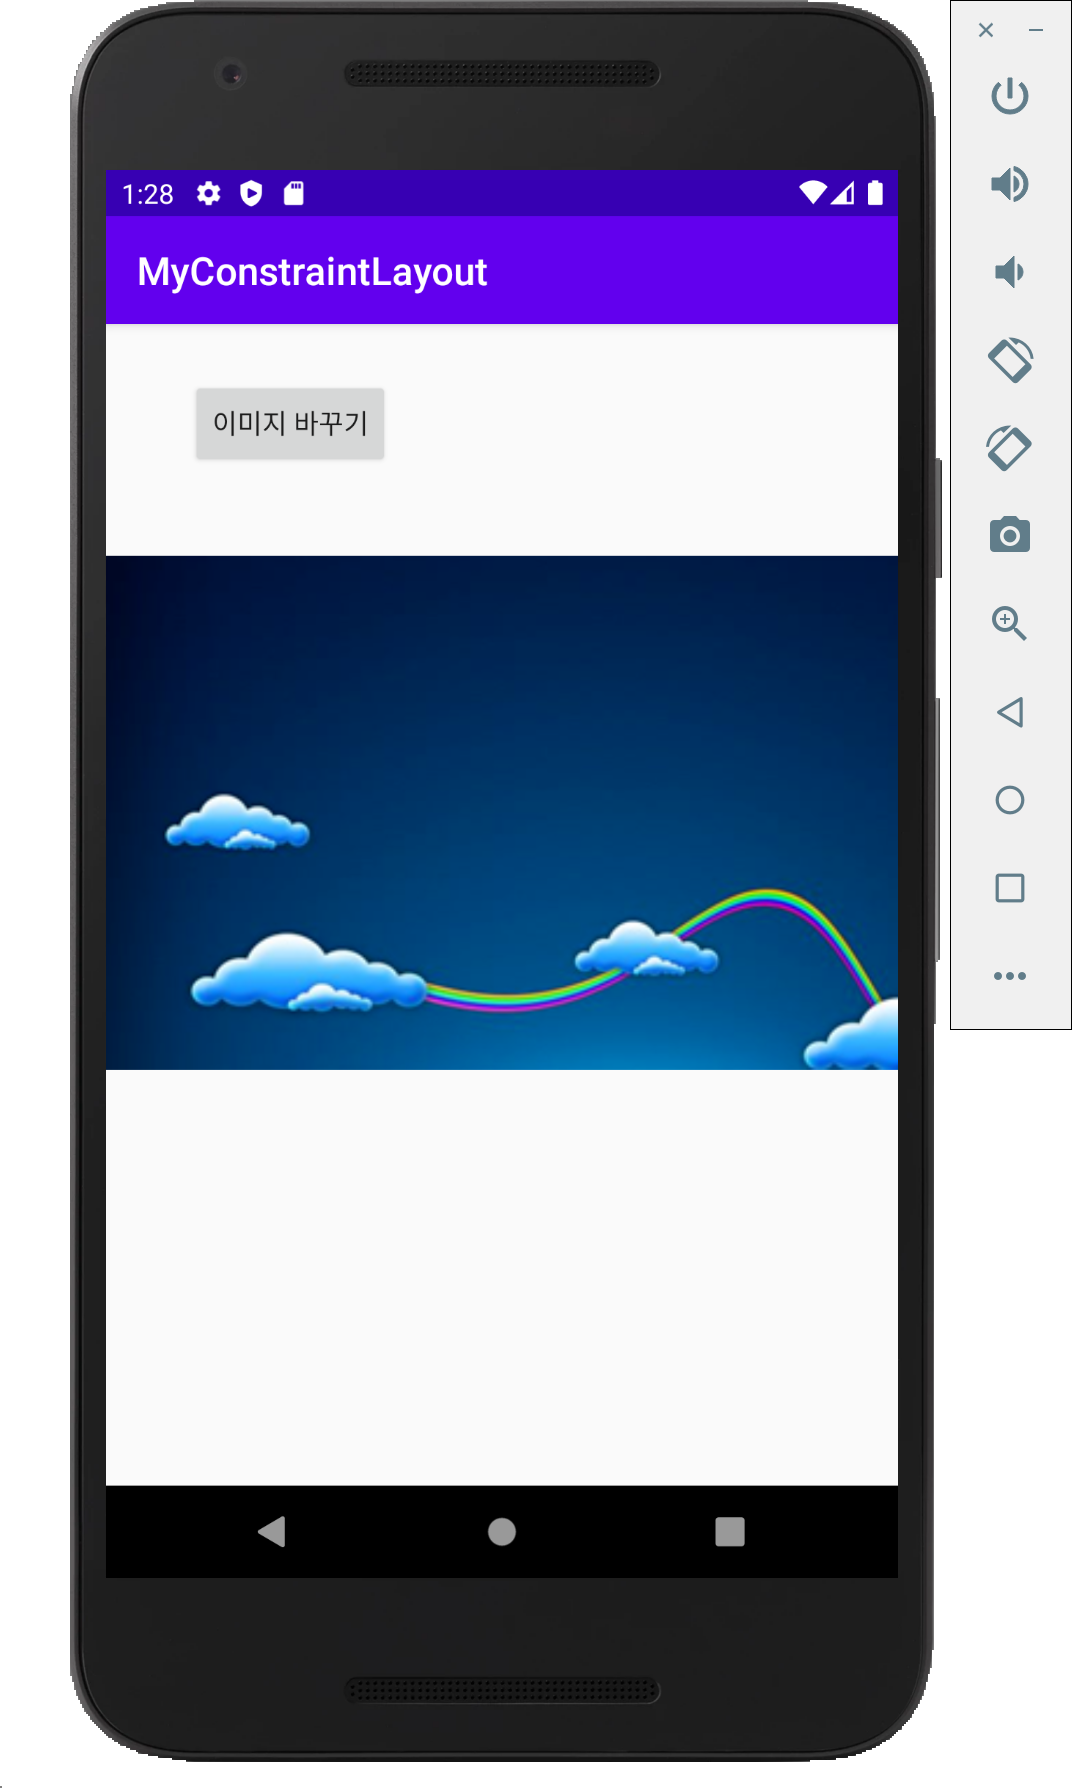

(이전에 res > drawble 폴더에 이미지 파일을 넣어야 합니다.)
<?xml version="1.0" encoding="utf-8"?>
<androidx.constraintlayout.widget.ConstraintLayout xmlns:android="http://schemas.android.com/apk/res/android"
    android:layout_width="match_parent"
    android:layout_height="match_parent">

    <Button
        android:id="@+id/button"
        android:layout_width="wrap_content"
        android:layout_height="wrap_content"
        android:onClick="onButton1Clicked"
        android:text="이미지 바꾸기"
        app:layout_constraintBottom_toBottomOf="parent"
        app:layout_constraintEnd_toEndOf="parent"
        app:layout_constraintStart_toStartOf="parent"
        app:layout_constraintTop_toTopOf="parent" />

    <FrameLayout
        android:layout_width="436dp"
        android:layout_height="356dp"
        app:layout_constraintEnd_toEndOf="parent"
        app:layout_constraintStart_toStartOf="parent"
        app:layout_constraintTop_toBottomOf="@+id/button">

        <ImageView
            android:id="@+id/imageView"
            android:layout_width="match_parent"
            android:layout_height="match_parent"
            android:visibility="invisible"
            app:srcCompat="@drawable/dream01" />

        <ImageView
            android:id="@+id/imageView2"
            android:layout_width="match_parent"
            android:layout_height="match_parent"
            app:srcCompat="@drawable/dream02" />
    </FrameLayout>
</androidx.constraintlayout.widget.ConstraintLayout>
xml 레이아웃 파일에 FrameLayout 안에 두 개의 ImageView를 넣습니다. 하나의 visibility를 invisible로 놓습니다. button에 이벤트를 연결합니다.
package com.example.myconstraintlayout;

import androidx.appcompat.app.AppCompatActivity;

import android.os.Bundle;
import android.view.View;
import android.widget.ImageView;

public class MainActivity extends AppCompatActivity {
    ImageView imageView;
    ImageView imageView2;
    int index = 0;
    @Override
    protected void onCreate(Bundle savedInstanceState) {
        super.onCreate(savedInstanceState);
        setContentView(R.layout.activity_main);
        imageView = (ImageView) findViewById(R.id.imageView);
        imageView2 = (ImageView) findViewById(R.id.imageView2);
    // 앱이 실행됐을 때 메모리에 만들어진 ImageView 객체를 찾은 다음 변수에 할당한다.
    }
    public void onButton1Clicked(View v) {
        index += 1;
        if (index > 1) {
            index = 0;
        }
        if (index == 0) {
            imageView.setVisibility(View.VISIBLE);
            imageView2.setVisibility((View.INVISIBLE));
        }
        else if (index == 1) {
            imageView.setVisibility(View.INVISIBLE);
            imageView2.setVisibility(View.VISIBLE);
        }
    }
}
MainActivity에서 id를 통해 2개의 객체를 받고, onButton1Clicked 함수를 구현합니다.
8. 테이블 레이아웃
격자 형태로 배치하는 레이아웃입니다. TableLayout은 각각 행을 정의하는 TableRow로 구성됩니다. 각 행에는 0개 이상의 셀이 있습니다. 각 셀은 하나의 View 객체를 보유 할 수 있습니다.
TableLayout의 자식은 layout_width 속성을 지정할 수 없습니다. width는 항상 MATCH_PARENT입니다. 그러나 layout_height 속성은 자식에 의해 정의될 수 있습니다. 기본값은 WRAP_CONTENT입니다. 자녀가 TableRow인 경우 height는 항상 WRAP_CONTENT입니다.
코드와 XML 모두에서 열 순서대로 셀을 행에 추가해야합니다. 열 번호는 0부터 시작합니다. 자식 셀의 열 번호를 지정하지 않으면 사용 가능한 다음 열로 자동 증가합니다. 열 번호를 건너 뛰면 해당 행에서 빈 셀로 간주됩니다.
XML 속성
| XML 속성 | |
|---|---|
| android:collapseColumns | 축소 할 열의 인덱스 (0부터 시작)입니다. |
| android:shrinkColumns | 축소 할 열의 인덱스 (0부터 시작)입니다. |
| android:stretchColumns | 늘릴 열의 인덱스 (0부터 시작)입니다. |
자세한 내용은 아래 링크를 참조하세요.
테이블 레이아웃 예시
<?xml version="1.0" encoding="utf-8"?>
<TableLayout xmlns:android="http://schemas.android.com/apk/res/android"
android:layout_width="match_parent"
android:layout_height="match_parent"
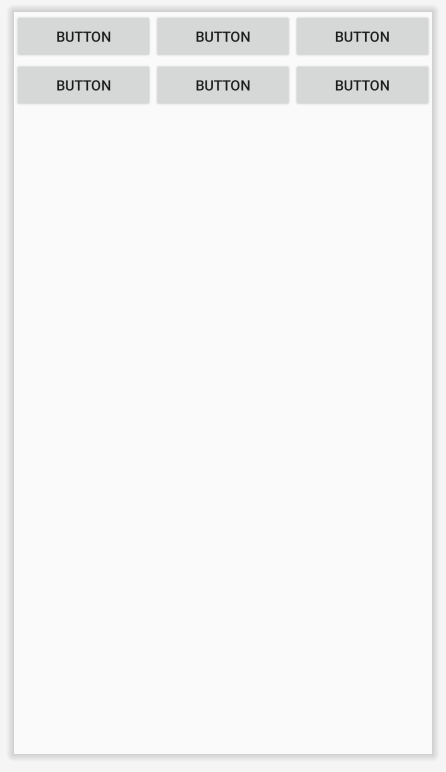
android:stretchColumns="0, 1, 2">
<!-- 중략 (6개의 버튼을 2열에 걸쳐 만듦) -->
</TableLayout>
위 코드와 같이 strecthColumns 속성을 0, 1, 2로 두면 값에 해당하는 행의 width가 늘어나 전체 table의 width를 채웁니다.
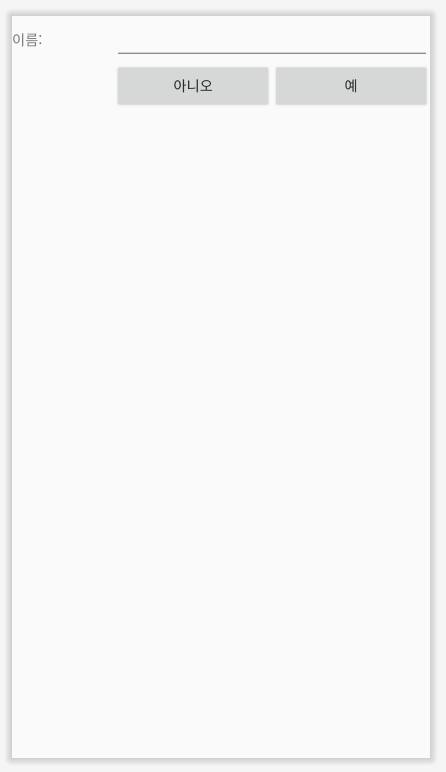
다른 예제를 살펴봅시다.
<?xml version="1.0" encoding="utf-8"?>
<TableLayout xmlns:android="http://schemas.android.com/apk/res/android"
    android:layout_width="match_parent" android:layout_height="match_parent"
    android:stretchColumns="0, 1, 2">
    <TableRow
        android:layout_width="match_parent"
        android:layout_height="wrap_content" >
        <TextView
            android:layout_width="wrap_content"
            android:layout_height="wrap_content"
            android:text="이름: "/>
        <EditText
            android:layout_width="wrap_content"
            android:layout_height="wrap_content"
            android:layout_span="2" />
    </TableRow>
    <TableRow
        android:layout_width="match_parent"
        android:layout_height="wrap_content">
        <Button
            android:layout_width="wrap_content"
            android:layout_height="wrap_content"
            android:text="아니오"
            android:layout_column="1" />
        <Button
            android:layout_width="wrap_content"
            android:layout_height="wrap_content"
            android:text="예"
            android:layout_column="2" />
    </TableRow>
</TableLayout>
위 코드와 같이 테이블 뷰의 layout_span을 지정하면 그 값만큼 셀을 차지합니다. layout_column을 지정하면 값에 해당하는 행에 위치합니다.